You can quickly setup an email campaign using Sends in Norby. Whether it's going to 10 or 1000 people, you'll be able to connect with your audience in a very personal manner.
Please note that recipients must be subscribed to receive your marketing email messages. You can review a list of contacts who have opted into receiving email marketing messages by going to your contacts list in the contacts section of your Norby account. This number may be different from your list of total contacts.
How to Create an Email Send
- From the left-hand navigation menu, select Sends.
- Next, select the +New option in the right hand corner.
- A pop-up will appear and prompt you to choose Email or SMS. Choose Email.
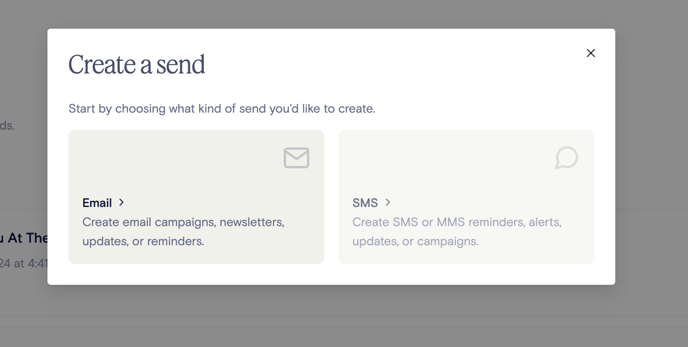
- Next, choose a category for your unsubscriber groups: General, Event Updates, Blog, Updates, Survey, Invitation, Newsletter, Sale, Shopping, Product Launch, or Resource.
-
An Unsubscribe Group in our SaaS platform allows you to categorize subscribers based on their preferences. This categorization helps tailor communication and enhance subscriber engagement
-
-
- With the Event Updates category, you can send important event notifications to all registered participants for a specific event, even if they haven’t opted into marketing communications. This makes it easy to send multiple event reminders using the Sends tool. Learn more about creating and managing events here.
- When you have a catchy one, enter in the Subject.
- Decide on the preview text (this is what appears in the recipient's inbox).
- Click the Advanced Settings dropdown if you'd like to edit:
- Sender name
- Reply-to-email
- At this point, things should look something like this on your end.
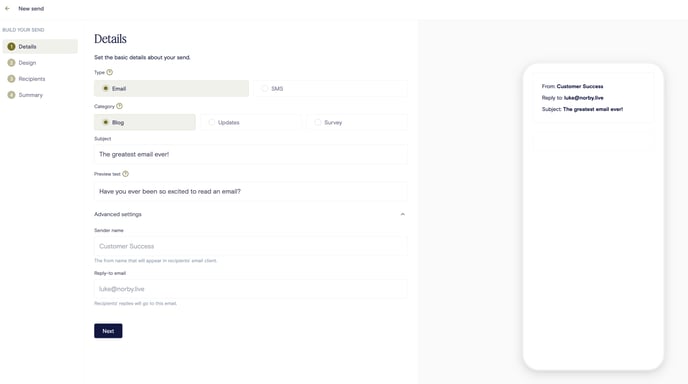
If everything looks good so far, select the Next button to move onto the Design section.
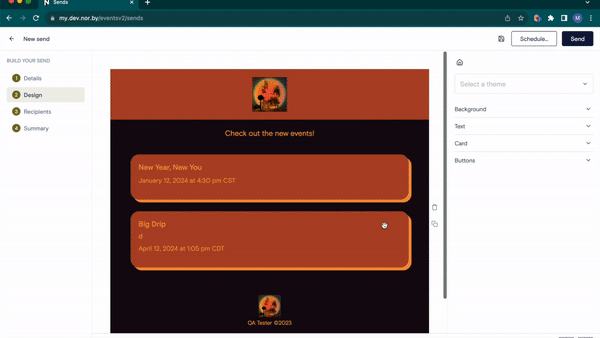
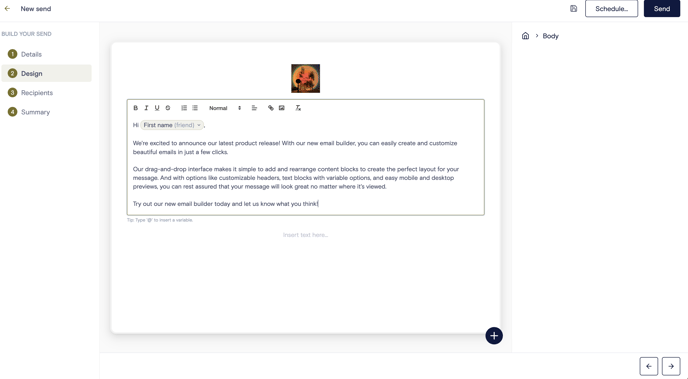
How to Design Your Email
Our drag-and-drop interface makes it simple to add and rearrange content blocks to create the perfect layout for your message. And with options like customizable headers, text blocks with variable options, and easy mobile and desktop previews, you can rest assured that your message will look great no matter where it's viewed. Let's dive in!
To design a new email, you won't have to start from scratch.
- Customize the look and feel of your emails with themes! Similar to landing pages, select from a curated list of themes to give each email a distinct look when you want to switch things up. Your emails will adopt your theme's background and text colors automatically.
- By default, your emails will adopt the branding of the account-wide theme you've defined in the Appearance section of your dashboard. Learn how to edit your Appearance here.
- A new email draft includes a Header block and two Text blocks, one for the body of the message and one for the footer.
- You can add blocks, as well as re-order their position by dragging and dropping to the desired section.
- Hover over a block to duplicate or delete it using the floating buttons on the right.
There are 2 ways to add a new block:
- Add a block to a specific section - Hover over the preview email and click on the “+” that appears between blocks.
- Add a block to the bottom of the email - Navigate to the bottom right corner of the preview email and click on the large “+” to add a block to the bottom of the email.
Choose between 11 block types to add:
- Layout
- Header - Add an image, change the header size, and add a click-through URL. The default image will be your Norby Profile image, but you can always add a different image.
- To add an image to the header block, click on the block and then select Upload File. To adjust the height of the header image, move the circle to the left of the
- Footer: Add a standardized footer section to emails to ensure compliance and provide useful information to recipients. This can include contact information, unsubscribe links, and legal compliance details.
- Spacer: Add adjustable empty space to your email to improve content layout and provide visual separation.
- Header - Add an image, change the header size, and add a click-through URL. The default image will be your Norby Profile image, but you can always add a different image.
-
- Divider: Insert horizontal lines or dividers between email sections for improved content organization and visual distinction.
- Basic
- Text Block - Utilize a combination of variables, links or images, bold or italicized text, and much more to ensure the email fits your needs.
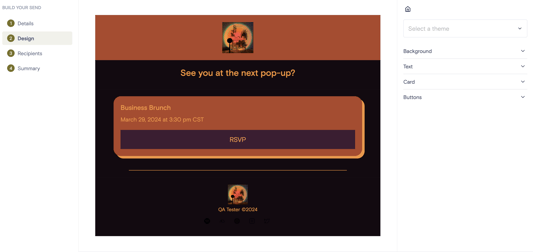
- Image Block - Upload an image, choose the page alignment, adjust image height and padding, and add a click-through URL.
- Button Block: Create clickable buttons with customizable text and appearance, which are ideal for prompting specific actions from email recipients.
- Pull Quote Block: Elevate your email templates with stylish pull quotes. Soon, choose from different presentation styles to highlight testimonials, quotes, and insights creatively.
- Content
- Event & Signup Blocks: Quickly add event and signup page details with dedicated blocks. Drive registration with direct RSVP links in your emails.
- Event & Signup Blocks: Quickly add event and signup page details with dedicated blocks. Drive registration with direct RSVP links in your emails.
-
- List of Events Block: Display a list of upcoming or past events. Filter events by tags and set the total count to display.
- List of Events Block: Display a list of upcoming or past events. Filter events by tags and set the total count to display.
- Embed
- YouTube Video Blocks: Embed YouTube videos in your emails effortlessly by pasting the URL. This will generate a video placeholder in an email template that links out to a Youtube video. Enhance engagement and click-through rates with video marketing.
To edit a block, simply click on it and the block will expand to display customization settings. When you're done editing, click anywhere outside of the block to collapse the editor and review your changes.
How to Personalize Your Email
Within a text block you can utilize variables by simply using the @ button to pick from any of these options. Click on Select Token and a drop-down will appear that lists User variables and Content variables to pull data from your contacts, events, and/or signups.
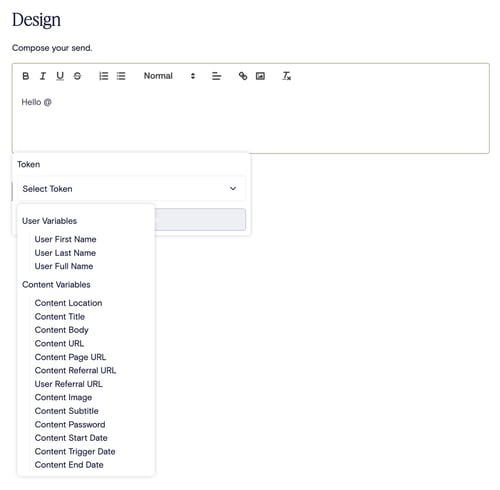
You can utilize a combination of variables, links or images, bold or italicized text, and much more in the design builder to ensure the email fits your needs. For more information on how to use variables, check out this Variables FAQ.
How to Choose Recipients
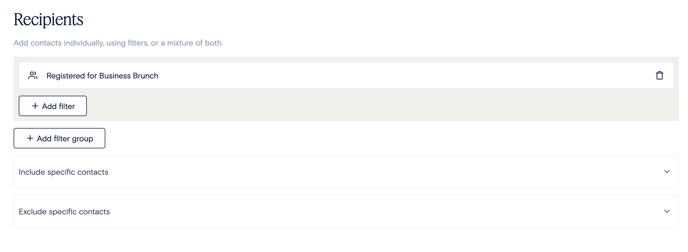
All sends default to include all contacts as recipients of the message.
- filtering for specific tags, events, signup forms, email or SMS engagement behavior
-
Check out this help article to learn how to use Norby's filters and filter groups for better-targeted lists.
-
- adding contacts individually
- or excluding contacts individually
Confirming Opt-in Status
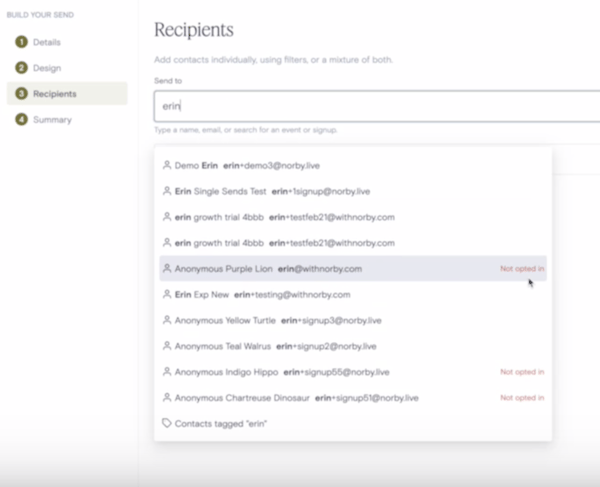
When specifying your list of recipients, you can review the marketing opt-in status of contacts in your search results. This lets you see at a glance whether they’re actually opted into the type of communication you’re sending.
-
- Note: Recipients that are not opted in to email marketing will have red text at the end of their listing that displays “Not opted in”
Below is an example of searching for and selecting a specific contact:
Here is an example of how you can utilize the different options on a past event:
Summary Page aka "The Final Steps"
Before sending the email, you have a few different options to help with quality assurance:
- Send a test message (you can select up to 10 email addresses to send a test version)
- Preview a list of recipients (a quick note, that the preview list will max out at 30)

Saving & Publishing Your Page
Finally, via the options available in the right-hand corner, you can do one of the following:

- Save as draft (this will go to your Drafts folder in the Sends menu)
- When you create an Event, Signup Form, Page, or Send, any changes you make will automatically be saved as a draft. Additionally, if you explicitly click on "Save" in the upper right-hand corner, your draft will be saved and you can continue working on it without being redirected to the dashboard. This feature is designed to improve your productivity and convenience as you create and refine your content within our platform.
- Please note that once you have published or scheduled your content, our system will no longer be able to automatically save your progress. This is because the event, sign-up, page, or send is already live. Therefore, you will have to explicitly publish any new changes you make from that point onwards.
- Schedule the send (you'll be prompted to choose a time + date to send the email)
- Send - and, just so you know, that will send the email right now.
Recommended Reading
However, you can add contacts individually, using filters, or a mixture of both.
use the search bar to:
- only choose a specific recipient(s).
- choose all or only certain registrants from an event.
- audience members who completed a signup.
- using event or signup custom fields you can only select a specific group of recipients based on characters from questions you asked of the registrant.
The choices are endless!
Confirming Opt-in Status
When specifying your list of recipients, you can review the marketing opt-in status of contacts in your search results. This lets you see at a glance whether they’re actually opted into the type of communication you’re sending.
-
- Note: Recipients that are not opted in to email marketing will have red text at the end of their listing that displays “Not opted in”
Below is an example of searching for and selecting a specific contact:
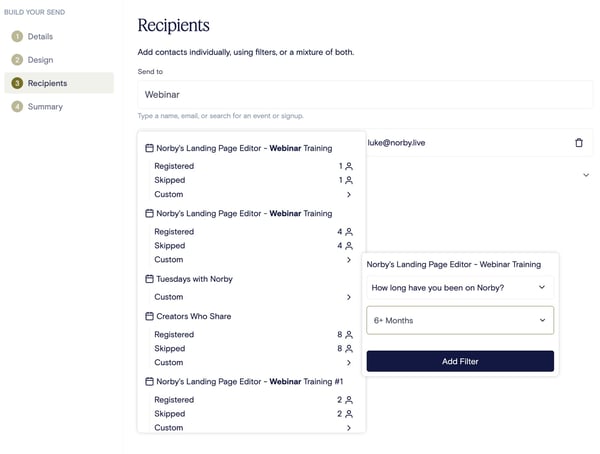
Here is an example of how you can utilize the different options on a past event:
In the example below we've selected a specific group from a past event, contacts who have the "Super Fan" tag, and we chose an individual recipient named Luke. Now, select Next.

Summary Page aka "The Final Steps"
Before sending the email, you have a few different options to help with quality assurance:
- Send a test message (you can select up to 10 email addresses to send a test version)
- Preview a list of recipients (a quick note, that the preview list will max out at 30)
Saving & Publishing Your Page
Finally, via the options available in the right-hand corner, you can do one of the following:
- Save as draft (this will go to your Drafts folder in the Sends menu)
- When you create an Event, Signup Form, Page, or Send, any changes you make will automatically be saved as a draft. Additionally, if you explicitly click on "Save" in the upper right-hand corner, your draft will be saved and you can continue working on it without being redirected to the dashboard. This feature is designed to improve your productivity and convenience as you create and refine your content within our platform.
- Please note that once you have published or scheduled your content, our system will no longer be able to automatically save your progress. This is because the event, sign-up, page, or send is already live. Therefore, you will have to explicitly publish any new changes you make from that point onwards.
- Schedule the send (you'll be prompted to choose a time + date to send the email)
- Send - and, just so you know, that will send the email right now.
Recommended Reading
Confirming Opt-in Status
When specifying your list of recipients, you can review the marketing opt-in status of contacts in your search results. This lets you see at a glance whether they’re actually opted into the type of communication you’re sending.
-
- Note: Recipients that are not opted in to email marketing will have red text at the end of their listing that displays “Not opted in”
Below is an example of searching for and selecting a specific contact:
Here is an example of how you can utilize the different options on a past event:
In the example below we've selected a specific group from a past event, contacts who have the "Super Fan" tag, and we chose an individual recipient named Luke. Now, select Next.
Summary Page aka "The Final Steps"
Before sending the email, you have a few different options to help with quality assurance:
- Send a test message (you can select up to 10 email addresses to send a test version)
- Preview a list of recipients (a quick note, that the preview list will max out at 30)
Saving & Publishing Your Page
Finally, via the options available in the right-hand corner, you can do one of the following:
- Save as draft (this will go to your Drafts folder in the Sends menu)
- When you create an Event, Signup Form, Page, or Send, any changes you make will automatically be saved as a draft. Additionally, if you explicitly click on "Save" in the upper right-hand corner, your draft will be saved and you can continue working on it without being redirected to the dashboard. This feature is designed to improve your productivity and convenience as you create and refine your content within our platform.
- Please note that once you have published or scheduled your content, our system will no longer be able to automatically save your progress. This is because the event, sign-up, page, or send is already live. Therefore, you will have to explicitly publish any new changes you make from that point onwards.
- Schedule the send (you'll be prompted to choose a time + date to send the email)
- Send - and, just so you know, that will send the email right now.
Recommended Reading