Tap into the power of tags for personalized SMS and email campaigns and tailored customer experiences.
Organizing your contact list with Norby is made simple with the use of tags. These labels or categories allow you to group your subscribers based on specific characteristics, behaviors, or preferences. For instance, if you are hosting an event in Chicago, and plan to market to this group again, you could add the tag “Chicago” when configuring your Event Settings. This way, you can easily identify who from your contact list is based in the area and reach out to them for future events. Other examples of tag categories include:
- Demographics
- Location ("Chicago," "West Coast," "Europe")
- Occupation ("Student," "Professional," "Entrepreneur")
- Engagement Levels
- Opened Email ("Super Fans," "Active Subscribers")
- Viewed Event Page ("Visitors," "Event Prospects" )
- Note: The best way to add these types of tags is to first filter your contacts based on engagement behavior. Learn more about how to do this with filter groups and saved contact lists here.
- Subscription Type
- Newsletter subscribers ("Newsletter Subscribers")
- Event notifications ("Webinar Attendees," "Conference Registrants")
How to Add Tags
You can add tags when you manually import contacts or automatically collect contacts with Signup Forms and Events. When you’re ready to communicate with these contacts, use the Sends feature to filter message recipients into specific lists based on your unique tags (check out our Sends how-to guide here).
There are 4 ways to add tags:
-
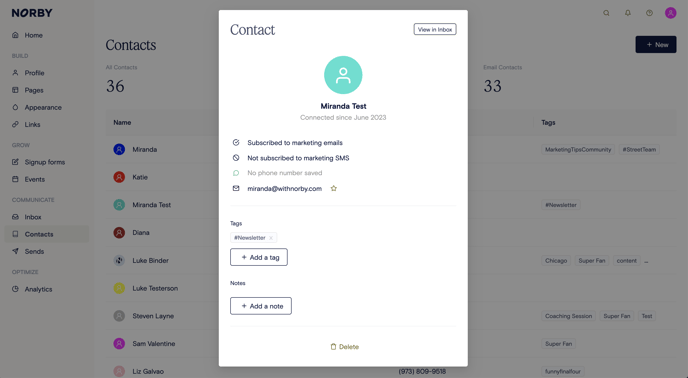
Individually add tags via Contacts
From the Norby Dashboard, navigate to the left hand side and click on the Contacts page.
- Click on an existing contact. A contact card will pop up.
- From here, click on “Add a tag” and type in what descriptor you want to use for this individual.
- Press enter/return on your keyboard to save the tag.
- Proceed to add as many tags as you’d like.
- To remove a tag, click the “x” on the tag.
- Click Publish to save your changes.
-
Bulk add tags via Imported Contacts
Norby currently supports importing names, emails, email marketing status, and contact tags via CSV. First, prepare your spreadsheet with 4 columns.
- Name
- Marketing Status
- Tags
In the Tags column, type in the descriptor you want to use to categorize contacts.
You can use copy and paste to apply the same tag to multiple contacts at once.
Also, if you have multiple tags for a contact, add a comma to separate them within a single cell.
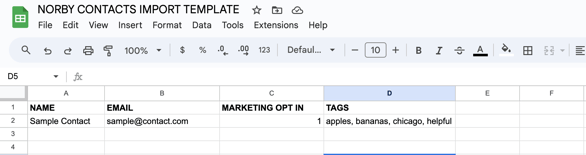
Note: If you want to upload a CSV to edit existing contacts and their tags, keep in mind that tags are additive and will not be overwritten. For example, you may have existing tags of "Podcast" and "Super Fan" so if you upload a list of contacts with tags "Book Club" and the contacts match the system will add "Book Club" and keep both "Podcast" and "Super Fan" on the contact record.
To import the tagged contacts:
From the Norby Dashboard, navigate to the left hand side and click on the Contacts page.
- In the top right, click the ”New” button and then select ”Upload a CSV of contacts.”
- You will then be able to import a CSV containing contact information from your device.
- When the import is successfully completed, you will get a notification at the top of the Contacts page.
- Click out of the contacts tab and then back in to see your imported contacts.

-
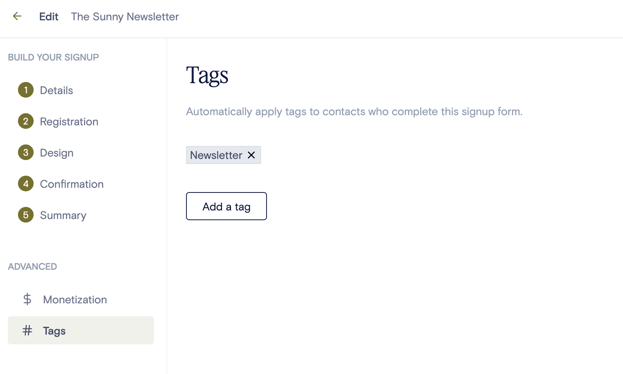
Automatically add tags via Signup Forms & Events
From the Norby Dashboard, navigate to the left-hand side and click on the Signup Form or Event page.
- Click the “New” button to add a new Signup form or Event.
- In the Details section, add a Title.
- In the Advanced section, click on Tags.
- Click on “Add a tag” and type in what descriptor you want to use for this Signup form or Event.
- Press enter/return on your keyboard to save the tag.
- Proceed to add as many tags as you’d like.
- To remove a tag, click the “x” on the tag.
- Click Publish to save your changes.
- Whenever someone registers for this particular signup form or event, this tag will be added to their contact card.
- Whenever someone registers for this particular signup form or event, this tag will be added to their contact card.
-
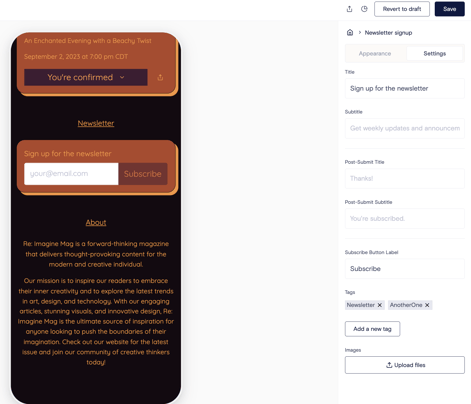
Automatically add tags via the Newsletter Signup block (Landing Page Editor)
From the Norby Dashboard, navigate to the left-hand side and click on Pages.
Select a landing page to edit.
In the Landing Page Editor, navigate to the left-hand side for the block editor.
- Click the “+” to add a new block from the pop-up menu.
- From the Content section, select Newsletter Signup.
- From the new Newsletter Signup block, navigate to the right side of the screen to edit the Settings & Appearance of the block.
- Within Settings, add a Title and Subtitle.
- Click on ”Add a new tag” to segment your audience and make it easier to identify Newsletter Subscribers in your Contacts.
- When it comes time to send your newsletter out, you can filter for this specific tag or the title of this newsletter signup when choosing recipients.
- Click Save to publish your changes.