Grow your email list by embedding a Norby Signup Form to collect newsletter subscribers.
An opt-in form is a form on a website that allows visitors to sign up and provide their contact information, such as their email address, in order to receive updates, free downloads, or exclusive content. You can do this with Norby by adding a scroll pop-up embed form to your website. Here’s how:
Creating a Signup Form
Before you can add a Norby opt-in form to your website, you need to create a signup form. Here’s how:
- Navigate to the Signup Forms page.
- Click the "New" button.
- Follow the prompts to create your signup form. You can customize the form fields, choose a design template, and add your branding. Check out this how-to guide on creating a signup form.
- Pro-tip: Add a tag to easily segment your subscribers.
- Once you’re done, click the "Publish" button.
Embedding the Signup Form
After you have created your signup form, you can embed it on your website. Here's how to find the scroll pop-up embed:
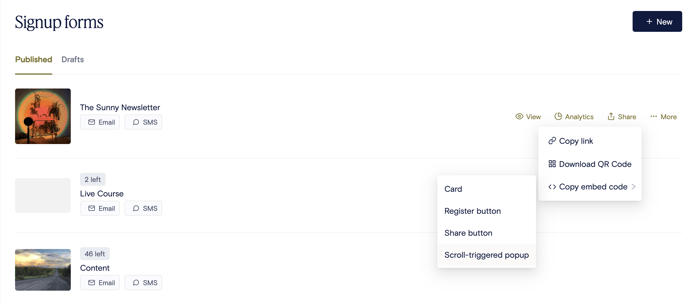
- When you save the sign up form, go back to the main Signup Forms page to see a list of all of your Published signup forms.
- Hover over the Signup form you want to embed into your website.
- Then, hover over the Share option.
- Next, hover over Copy Embed Code to reveal the option for Scroll-triggered pop up and click this to copy the embed code.
Follow these instructions to add the embed to Squarespace, Wix, and Webflow:
Squarespace
- Log in to your Squarespace account and navigate to the page where you want to add the form.
- Click on the gear icon in the top left corner of your page editor to access the page settings.
- In the settings menu, select "Advanced" and then "Code Injection."
- Paste the embed code for your Norby signup form into the "Header" section.
- Save your changes and publish your page.
Wix
- Log in to your Wix account and navigate to the page where you want to add the form.
- Click on the "+" icon to add a new element to your page.
- Select "More" and then "HTML iframe."
- Drag the HTML iframe element to where you want it on your page.
- Click on the HTML iframe element and then click "Enter Code."
- Paste the embed code for your Norby signup form into the code editor.
- Save your changes and publish your page.
Webflow
- Log in to your Webflow account and navigate to the page where you want to add the form.
- Click on the "+" icon to add a new element to your page.
- Select "Embed" and then drag the Embed element to where you want it on your page.
- Click on the Embed element and then click "Open Code Editor."
- Paste the embed code for your Norby signup form into the code editor.
- Save your changes and publish your page.
That’s it! With these instructions, you should be able to add a Norby opt-in form to your website quickly and easily. If you need further assistance, please contact Norby customer support via support@withnorby.com.